Multi-part molds
A two-part silicone mold with keys
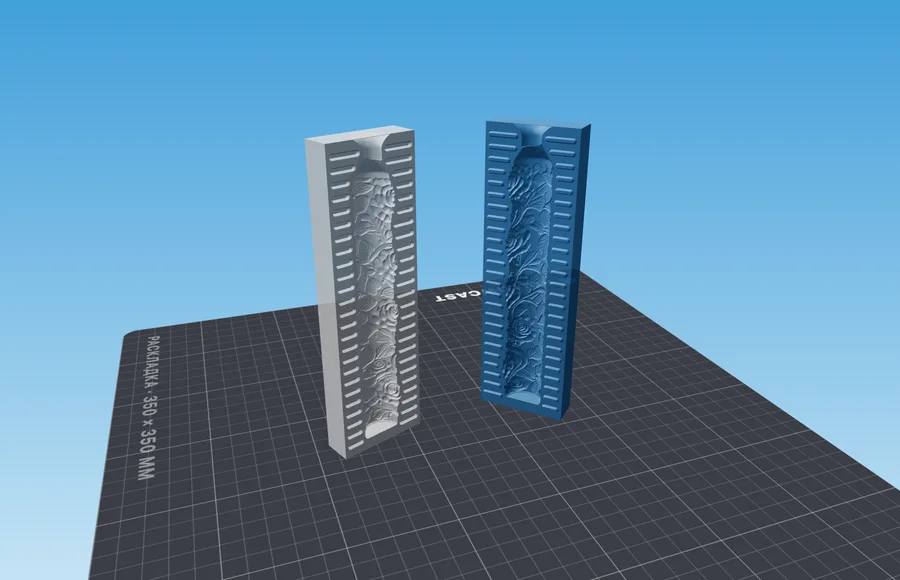
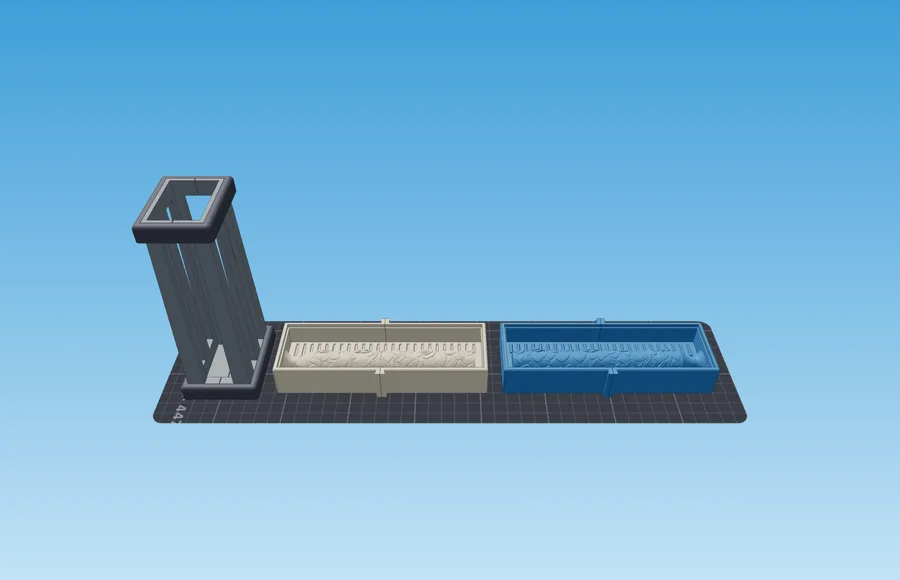
Cuts the model in half and builds two split formworks: pour silicone into both and you get a two-part mold with a cast seam, no knife cut. The walls come off separately from the plate, so the half never has to be flexed out. The set includes a jacket and the rings that cinch the mold shut for the pour.
- Input: Model
- Output: 2 split formworks, a casing and rings
Building a mold and looking it over needs no account. Signing in is only required to download.
 Casting result
What you get
- Two split formworks with the model halves fused to their plates: both are poured at the same time, silicone never touches silicone.
- The plate and the walls are separate parts on printed clamps: the walls come off one by one, so the half is never flexed out of a box.
- A registration lock all along the seam: either a frame around the box floor or slots in horizontal rows. Bumps in one box, matching dimples in the other, so the halves seat into each other on their own.
- A wick groove along the seam and a through mouth on top: neither has to be cut with a knife.
- A two-piece jacket and cinch rings: a ring runs down the taper and pulls the seam tighter the lower it sits.
How it works
- 1Upload the masterThe very model you will be casting copies of. The silicone becomes the mold; everything printed is tooling around it.
- 2Place the seamThe plane in the viewport is the future parting line. Undercuts relative to it are highlighted right away: the seam has to run through the widest place on the model.
- 3Print, pour both, assembleClamp the walls around the plate and pour silicone into both boxes up to the ledge. A day later take the walls off, lift the halves off their plates, seat them on the keys, drop them into the jacket and drive the rings down.
Material and process
What to keep in mind before pouring
| Setting | Value | Why |
|---|---|---|
| Silicone at the sides | 10 mm small, 15–20 mm large | A thin mold tears while demolding, a thick one merely costs more. The keys live in the same allowance, and the wider it is the longer they run |
| Pour level | Up to the ledge on the inner wall | The ledge sits exactly at the intended thickness of the half: overfill goes into the jacket, underfill leaves the mold thin |
| How the parts hold together | Ridge and groove | A frame around the perimeter holds the seam along its whole length and seals it against leaks; rows of slots do not seal it. Neither uses a pin: a cylinder in silicone is an undercut and tears, while a sloped lock snaps out |
| Release agent | Optional, all over the formwork | Platinum silicone sticks to PLA less than tin-cure does, but it still sticks |
Slicer settings are the same for every mold and live on their own page: how to print molds
If something went wrong
Symptom, and what to change
- The halves will not line up
- The lock did not fit: add silicone at the sides, or reduce the key height.
- A ring will not slide down the jacket
- The printer prints oversize: clearance → 0.20–0.25 mm, and print one ring as a test.
- The rings are down but the seam leaks
- The cinch travel is used up — increase the jacket seam gap: a 12 mm ring needs about 0.6 mm, a taller ring needs more.
- The casting comes out torn
- Undercuts relative to the seam: rotate the model so the seam runs through its widest place.
Questions
Good to know
How is this different from Moldboxer?
Moldboxer is a desktop app: you download it, install it and buy a license. Here the mold is built in the browser, there is nothing to install, and there is a free plan. The fitted two-part mold they make is built by /fitted-split-silicone-mold; this one is a split mold with a cast seam along a plane. What we do not have: working offline and batch processing — models are built one at a time.
Why is this better than a mold you cut open with a knife?
A knife seam drifts with every demold: the edge tears, flash on the casting grows and the cut line stays visible. Here both halves are cast against the flat floor of a formwork, so the seam is cast and closes the same way two hundred times over. This is the scheme for a production run; for one or two castings /silicone-mold is simpler.
Are both formworks poured at the same time?
Yes, that is the whole point of two boxes. Silicone never touches silicone, no release layer between pours is needed and there is no day of waiting in between. Pour both up to the notch on the inner wall — it sits exactly at the intended thickness of the half. With «Rim above the level» set to 0 there is no notch, and you pour level with the rim.
How do the halves register against each other?
By a lock all along the seam, and by default that is a frame: a rail runs around the perimeter of the box floor between the model silhouette and the wall, standing proud in one box and sunk in the other. The silicone comes out with a groove and a matching ridge — they hold the seam along its whole length and seal it as well, because the silicone has no straight path out. Where the model or the mouth reaches into the frame, it breaks. The rail wall is straight, not sloped: a wedge pushes the halves apart under load and leaves a gap at the edge for flash to creep into — the lead-in comes from a chamfer along the edge instead. The other option is horizontal rows of slots: they hold just as well but do not seal the seam; there the short key does have a sloped wall, because it has to seat on its own. Not four keys at the edges: eight keys hold only the perimeter, and between them the flange spreads under the weight of the pour, which shows up as flash along the seam. And not a pin: a cylindrical pin in silicone is an undercut and tears on the first demold.
Why are the formwork walls printed separately from the floor?
A silicone half is pulled out of a one-piece trough by flexing it, and a thick block barely flexes while a straight wall suctions onto it. Here the plate with the model and the walls are separate parts: the walls are held by printed clamps and come off one by one after a day, so the half lifts straight off a flat plate.
Why a jacket and rings if the mold stands on its own?
Soft silicone bulges at the seam under a column of hot wax, and a tall mold tips over as well. The rings run down the jacket taper and pull the seam tighter the lower they sit — the same self-locking wedge as on the printed clamps.
Can any model be cut in half?
Not with a plane. We cut with a flat parting plane: columns, cubes, slabs and symmetric figures work, while a figure with an outstretched arm needs a curved parting line, which we do not build. Undercuts relative to the seam are highlighted in 3D before you print anything.
Does my model go to your server?
It is — but only for the time it takes to compute. We do not store it: no archives, no copies. Until you press the button, the file never leaves your browser.
Related tools